Fabulous Viewpoints Blog
CHRISTMAS 2025 & NEW YEAR 2026
08th December 2025
08th December 2025
IMPORTANT ANNOUNCEMENT FOR PRINT & FRAME ORDERS FOR IRELAND/NORTHERN IRELAND
All FRAME ORDERS placed up to Monday 8th December 2025 will be couriered before Christmas. All PRINT ONLY ORDERS placed up to Wednesday 10th December 2025 will be couriered before Christmas. Even so, the actual delivery is down to the courier - we can't guarantee an exact delivery date if you left it late so please order early.
Orders placed after the dates above won't be processed and sent out until AFTER New Year's Day 2026.
Once your order is placed, please email your mobile number to fabulousviewpoints@gmail.com
Note also that we will close from 24th December 2025 to 4th January 2026.
To sum up, we are not responsible for any late deliveries for print and frame orders. Once despatched, delivery is out of our hands. We will not under any circumstances be liable for a late delivery at Christmas as this is beyond our control. Note that once you place an order, you will not be able to cancel your order.
Finally, we would like to wish you a Merry Christmas and Happy New Year. We are really grateful to all our customers for your continued support.
Magic of the Coast
03rd December 2021
03rd December 2021
Blog entry by Adrian Hendroff
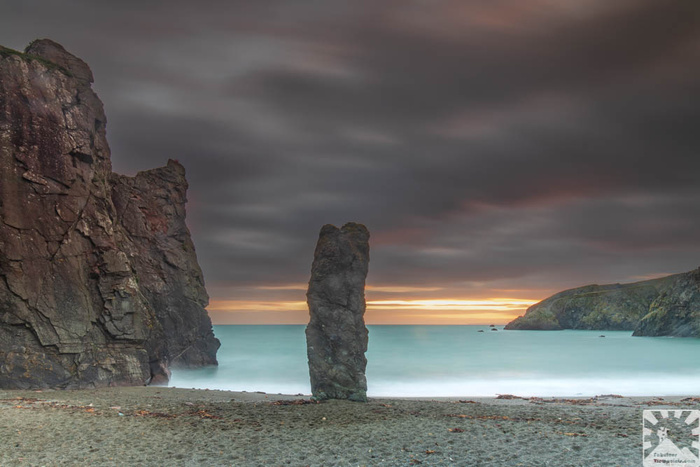
Sea-stack on the Copper Coast, one of the places visited on our dawn to dusk winter workshop.
Image (c) Adrian Hendroff
" The ocean stirs the heart, inspires the imagination and brings eternal joy to the soul."
- Robert Wyland
When it comes to landscape photography, there is something magnetic that draws me to the coast. Perhaps it’s the state of flux, always looking different from one visit to the next. Or maybe the combination of the elements and power of the sea, keeping it on the edge of change, making it unpredictable. Its character and mood changes with the weather, wind and tide, with each ebb and flow washing its beaches clean, preparing it for a new cycle to begin. Here I come time and again to be inspired, to stand in awe and to be enthralled by the forces of nature, transformative light and spellbinding beauty that is the coast. Let it be the benign swoosh of water, muted clatter of pebbles, call of the gulls, wind blowing through the dunes or a roaring cauldron of white water and spray – it is a delightful treat for the senses. Then there are the vast expanses of windswept sand, rocky pools, hidden coves, soaring cliffs, jagged sea-stacks and ancient rock formations. All these make the coast one of the most exhilarating environments for me to immerse myself in landscape photography.
In this blog, I’m going to share some tips and ideas on stuff related to coastal photography. However, before I do, I’d like to invite you to a unique winter workshop run from dawn to dusk along Ireland’s beautiful Copper Coast. During the winter months, when the sun rises to the southeast and sets to the southwest, this stretch of coast is an absolute delight to photograph, especially during the golden hour. The low-angled winter sun also works to our advantage for photography throughout the day. Click here for more dates, details and availability. If you use social media, please share this or tag/tell your friend that might be interested.
Back to the tips (you’ll get a few more at the workshop).
1. Check The Tides
When it comes to planning a coastal photoshoot, the tide state and height are one of the first things I’d check. A stretch of coastline looks totally different at low, mid and high tide, so local knowledge is important prior to a shoot. Use the My Tide Times App or sites such as tide-forecast.com
A sandy beach will be clean and devoid of footprints when the tide is receding. If you’re there early or late in the day, chances are there’ll be fewer people or no one about. Low tide also allows you to wander around without getting your feet wet and scout for subjects to use as a focal point that you otherwise wouldn’t see. Ripples in the sand can also act as good foreground interest when the tide is out.
On the other hand, shores with rocky coves or ledges tend to be more photogenic around mid to high tides, giving visually striking images. The moving water will add drama and motion to your image. Plus, all the clutter of barnacle and seaweed covered rocks will also be hidden.
One important thing to keep in mind wherever you are: make sure you don’t get cut out by the tide.
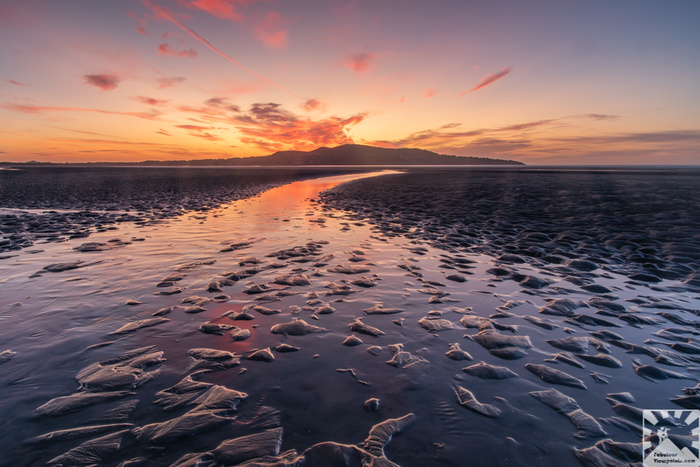
Dollymount Strand at low tide.Image (c) Adrian Hendroff
2. Get Close To The Water
This is something that excites me most when out on a coastal photoshoot. On the shoreline, chances are you’ll get jagged rocks, smooth boulders, shapely ledges and tidal pools – all interesting features you can use as a foreground, leading lines or a ‘frame within a frame’. Depending on the conditions, you’ll also get a myriad of wave patterns swirling around the rocks or reflective pools of water. When you are close to the water’s edge, the drama will be heightened.
You’ll need a pair of wellies and it goes without saying that only approach the water as long as you feel safe. Check the wind direction using websites like yr.no. If it is coming directly off the sea at more than 25km/h (15mph), you are almost guaranteed that your camera and gear will become coated with sea-spray and wave splashes. Ideally, you’ll want the wind to blow from any other direction than off the sea. Alternatively, you can also opt to stand further away and use a longer lens.
When shooting from the shoreline, a sturdy tripod is recommended to keep your camera steady from the wind and waves. Plant your tripod legs firmly in the wet sand or mount it securely on rock ledges before taking a shot. Also carry a couple of cleaning cloths and a small bottle of cleaning fluid in your pocket to wipe away any sea spray on your lens. Finally, when you’re back home, be sure to give your kit and tripod a good clean to avoid salt water corrosion.
Wave patterns on Killiney Beach against a colourful sky.Image (c) Adrian Hendroff
3. Fill The Sky With Colours
Twice a day over the golden hour, given the right conditions, the sky is painted with a palette of dynamic colours. These conditions will render those big, bold skies over the sea with an element of emotion and romance. At low tide, a wet, sandy beach will reflect the beautiful colours in the sky. Remember to slot in your polariser to make the colours ‘pop’ and also to reduce any glare and reflections in the sand.
Plan to be at a location well ahead of time - I often arrive a full hour before sunrise or well over an hour before sunset. Tools such as The Photographer’s Ephemeris or PhotoPills are useful to plan the direction of light. There’s also no harm researching the internet, stock libraries or photo-sharing sites such as Instagram, 500px or Flickr to see what others have done. Finally, check the weather forecast and cloud cover using websites such as yr.no. I will soon be running an online Zoom course on how to increase your hit-rate when it comes to photographing the golden hour. To register your interest, email fabulousviewpoints@gmail.com
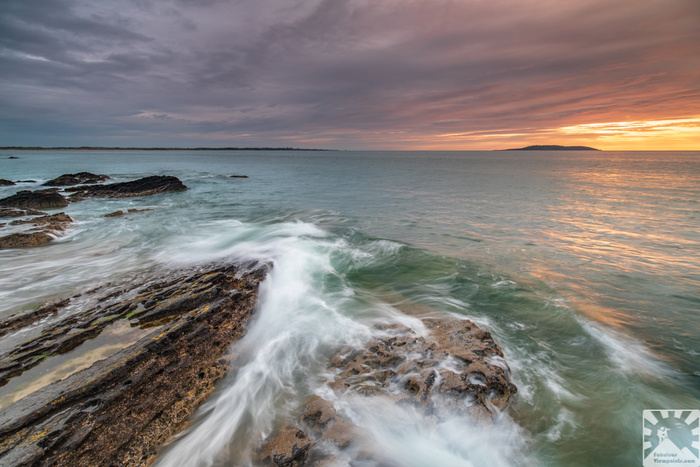
4. Fill Your Foreground
The coast has a multitude of interesting subjects that make a good foreground. In some cases, these also provide a natural lead-in line towards the horizon. These include boulders, rock formations, sea-stacks, sand dunes, tidal pools, harbour walls and wooden groynes. Side-lighting works well here, adding contrast and depth to your foreground subject.
A back-wash of waves can also fill your foreground with dynamic trails leading out to sea. If there are rocks or ledges, the water will swirl and also create leading lines. An exposure time of something between 0.5s to 2s will give you an image of the waves with its shape and texture maintained. Begin your exposure as soon as the waves start to recede into the sea.
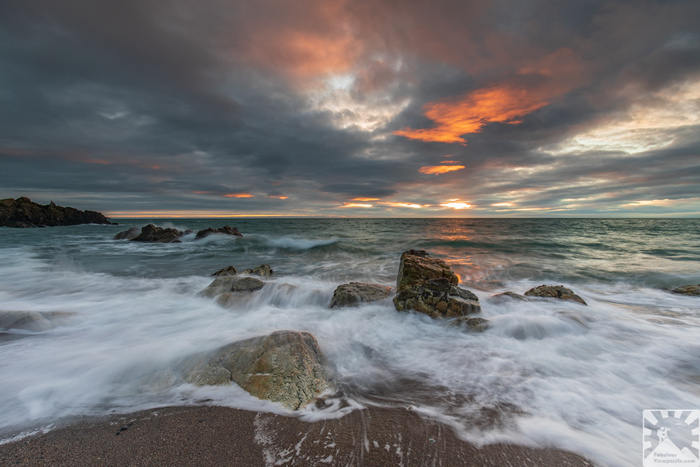
A foreground consisting of a rock ledge and swirling waters against a colourful sky. Image (c) Adrian Hendroff
5. Get Creative
The coast is a perfect place to experiment with filters. I recommend investing in a set of Neutral Density (ND) filters both straight (3, 4, 6 and/or 10 stops) and graduated (Soft/Medium/Hard/Reverse) – LEE, Kase and NiSi are good brands. Along with your polariser, these will allow you to set your shutter speed between 0.5s to 30s. This will blur the moving water and breaking waves by varying degrees to give a sense of motion or calmness. Longer exposures of one to three minutes in bulb mode will even turn a choppy sea into a ghostly mist; in most cases it is used to completely smooth the water, giving a ‘milky’ effect. Such filters will also transform moving clouds into elegant brushstrokes, giving an ethereal and even romantic atmosphere. Filters such as the LEE Stopper range will allow you shoot long exposures even during the middle of the day, useful when the day is overcast or filled with moody skies.
At the workshop, we’ll show you and discuss when to use Soft/Medium/Hard/Reverse grads, how to effectively place them and how not to overcook your grad usage. Finally, if the light across the horizon is too strong, consider exposure blending or HDR. Take two exposures: one for the foreground and another to capture the sky, then later blend them into a single image in software such as Adobe Lightroom.
A 160s exposure taken at Rush sand dunes just after sunrise. Image (c) Adrian Hendroff
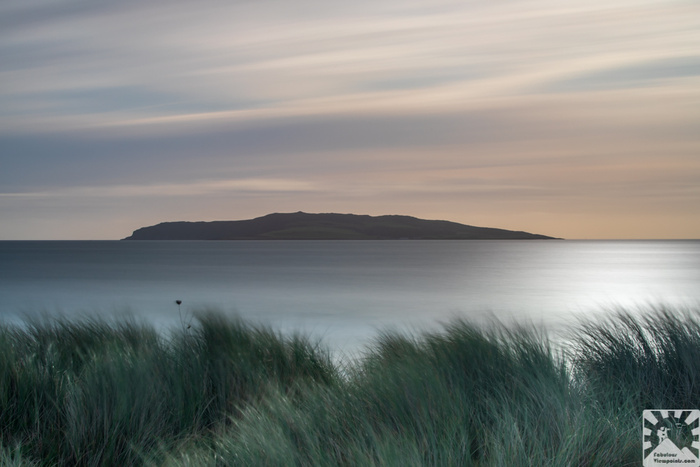
6. Less Is More
Solitary subjects like a single boulder or a sea-stack make good subjects in minimalistic images. By seeking out these isolated subjects, you will highlight just the key element and draw the viewer’s attention to it. Jagged rocks that protrude like daggers through the water and isolated stacks out to sea create mini-islands and powerful shapes – use a telephoto lens to frame your subject and make it stand out. Besides rocks and sea-stacks, other subjects like bathing rails, groynes and jetties can also be used.
7. Go Mono
For something different, consider converting your image into a monochrome version. This works well with the previous ‘Less Is More’ technique – dark, jagged rocks contrast well with soft, white water in a long exposure for example. Overcast conditions normally also work very well when converted to black and white, with the moody skies adding drama and mystery to your final image.
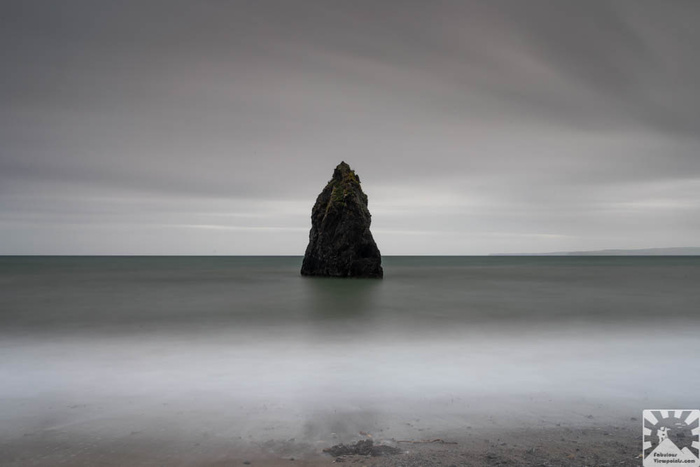
Sea-stack at Ballydowane Bay, Copper Coast. Image (c) Adrian Hendroff
8. Scout The Cliff Tops
The top of cliffs makes a good vantage point, giving a different perspective, often with spectacular views. The sense of context and scale is also magnified, especially by a wide-angle lens which will exaggerate the cliff’s height. In the spring and summer, cliff-tops are normally coloured with wildflowers such as sea pinks and yellow brooms – all ideal to fill your foreground with. Side-lighting also works well with wider cliff top compositions, with the directional light giving contrast, depth and texture to your image.
Cliff tops are also good places to photograph raging seas and powerful waves. However, stay well away from cliff edges and keep in mind the wind direction (you’d want to be sure the wind doesn’t blow you off the cliff and into the sea!) and strength (anything above 35km/h or 22mph is considered strong and should be avoided).
In some cases, the usage of a telephoto lens on a cliff top helps to create layered compositions, compressing the distance between headlands and coves by creating a ‘stacking effect’.
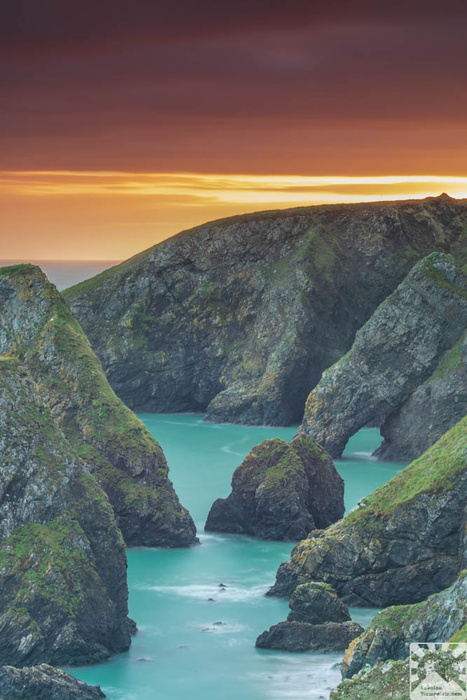
Cliff scenery along the Copper Coast shot at 100mm. Image (c) Adrian Hendroff
Sea-stack on the Copper Coast, one of the places visited on our dawn to dusk winter workshop.
Image (c) Adrian Hendroff
" The ocean stirs the heart, inspires the imagination and brings eternal joy to the soul."
- Robert Wyland
When it comes to landscape photography, there is something magnetic that draws me to the coast. Perhaps it’s the state of flux, always looking different from one visit to the next. Or maybe the combination of the elements and power of the sea, keeping it on the edge of change, making it unpredictable. Its character and mood changes with the weather, wind and tide, with each ebb and flow washing its beaches clean, preparing it for a new cycle to begin. Here I come time and again to be inspired, to stand in awe and to be enthralled by the forces of nature, transformative light and spellbinding beauty that is the coast. Let it be the benign swoosh of water, muted clatter of pebbles, call of the gulls, wind blowing through the dunes or a roaring cauldron of white water and spray – it is a delightful treat for the senses. Then there are the vast expanses of windswept sand, rocky pools, hidden coves, soaring cliffs, jagged sea-stacks and ancient rock formations. All these make the coast one of the most exhilarating environments for me to immerse myself in landscape photography.
In this blog, I’m going to share some tips and ideas on stuff related to coastal photography. However, before I do, I’d like to invite you to a unique winter workshop run from dawn to dusk along Ireland’s beautiful Copper Coast. During the winter months, when the sun rises to the southeast and sets to the southwest, this stretch of coast is an absolute delight to photograph, especially during the golden hour. The low-angled winter sun also works to our advantage for photography throughout the day. Click here for more dates, details and availability. If you use social media, please share this or tag/tell your friend that might be interested.
Back to the tips (you’ll get a few more at the workshop).
1. Check The Tides
When it comes to planning a coastal photoshoot, the tide state and height are one of the first things I’d check. A stretch of coastline looks totally different at low, mid and high tide, so local knowledge is important prior to a shoot. Use the My Tide Times App or sites such as tide-forecast.com
A sandy beach will be clean and devoid of footprints when the tide is receding. If you’re there early or late in the day, chances are there’ll be fewer people or no one about. Low tide also allows you to wander around without getting your feet wet and scout for subjects to use as a focal point that you otherwise wouldn’t see. Ripples in the sand can also act as good foreground interest when the tide is out.
On the other hand, shores with rocky coves or ledges tend to be more photogenic around mid to high tides, giving visually striking images. The moving water will add drama and motion to your image. Plus, all the clutter of barnacle and seaweed covered rocks will also be hidden.
One important thing to keep in mind wherever you are: make sure you don’t get cut out by the tide.
Dollymount Strand at low tide.Image (c) Adrian Hendroff
2. Get Close To The Water
This is something that excites me most when out on a coastal photoshoot. On the shoreline, chances are you’ll get jagged rocks, smooth boulders, shapely ledges and tidal pools – all interesting features you can use as a foreground, leading lines or a ‘frame within a frame’. Depending on the conditions, you’ll also get a myriad of wave patterns swirling around the rocks or reflective pools of water. When you are close to the water’s edge, the drama will be heightened.
You’ll need a pair of wellies and it goes without saying that only approach the water as long as you feel safe. Check the wind direction using websites like yr.no. If it is coming directly off the sea at more than 25km/h (15mph), you are almost guaranteed that your camera and gear will become coated with sea-spray and wave splashes. Ideally, you’ll want the wind to blow from any other direction than off the sea. Alternatively, you can also opt to stand further away and use a longer lens.
When shooting from the shoreline, a sturdy tripod is recommended to keep your camera steady from the wind and waves. Plant your tripod legs firmly in the wet sand or mount it securely on rock ledges before taking a shot. Also carry a couple of cleaning cloths and a small bottle of cleaning fluid in your pocket to wipe away any sea spray on your lens. Finally, when you’re back home, be sure to give your kit and tripod a good clean to avoid salt water corrosion.
Wave patterns on Killiney Beach against a colourful sky.Image (c) Adrian Hendroff
3. Fill The Sky With Colours
Twice a day over the golden hour, given the right conditions, the sky is painted with a palette of dynamic colours. These conditions will render those big, bold skies over the sea with an element of emotion and romance. At low tide, a wet, sandy beach will reflect the beautiful colours in the sky. Remember to slot in your polariser to make the colours ‘pop’ and also to reduce any glare and reflections in the sand.
Plan to be at a location well ahead of time - I often arrive a full hour before sunrise or well over an hour before sunset. Tools such as The Photographer’s Ephemeris or PhotoPills are useful to plan the direction of light. There’s also no harm researching the internet, stock libraries or photo-sharing sites such as Instagram, 500px or Flickr to see what others have done. Finally, check the weather forecast and cloud cover using websites such as yr.no. I will soon be running an online Zoom course on how to increase your hit-rate when it comes to photographing the golden hour. To register your interest, email fabulousviewpoints@gmail.com
4. Fill Your Foreground
The coast has a multitude of interesting subjects that make a good foreground. In some cases, these also provide a natural lead-in line towards the horizon. These include boulders, rock formations, sea-stacks, sand dunes, tidal pools, harbour walls and wooden groynes. Side-lighting works well here, adding contrast and depth to your foreground subject.
A back-wash of waves can also fill your foreground with dynamic trails leading out to sea. If there are rocks or ledges, the water will swirl and also create leading lines. An exposure time of something between 0.5s to 2s will give you an image of the waves with its shape and texture maintained. Begin your exposure as soon as the waves start to recede into the sea.
A foreground consisting of a rock ledge and swirling waters against a colourful sky. Image (c) Adrian Hendroff
5. Get Creative
The coast is a perfect place to experiment with filters. I recommend investing in a set of Neutral Density (ND) filters both straight (3, 4, 6 and/or 10 stops) and graduated (Soft/Medium/Hard/Reverse) – LEE, Kase and NiSi are good brands. Along with your polariser, these will allow you to set your shutter speed between 0.5s to 30s. This will blur the moving water and breaking waves by varying degrees to give a sense of motion or calmness. Longer exposures of one to three minutes in bulb mode will even turn a choppy sea into a ghostly mist; in most cases it is used to completely smooth the water, giving a ‘milky’ effect. Such filters will also transform moving clouds into elegant brushstrokes, giving an ethereal and even romantic atmosphere. Filters such as the LEE Stopper range will allow you shoot long exposures even during the middle of the day, useful when the day is overcast or filled with moody skies.
At the workshop, we’ll show you and discuss when to use Soft/Medium/Hard/Reverse grads, how to effectively place them and how not to overcook your grad usage. Finally, if the light across the horizon is too strong, consider exposure blending or HDR. Take two exposures: one for the foreground and another to capture the sky, then later blend them into a single image in software such as Adobe Lightroom.
A 160s exposure taken at Rush sand dunes just after sunrise. Image (c) Adrian Hendroff
6. Less Is More
Solitary subjects like a single boulder or a sea-stack make good subjects in minimalistic images. By seeking out these isolated subjects, you will highlight just the key element and draw the viewer’s attention to it. Jagged rocks that protrude like daggers through the water and isolated stacks out to sea create mini-islands and powerful shapes – use a telephoto lens to frame your subject and make it stand out. Besides rocks and sea-stacks, other subjects like bathing rails, groynes and jetties can also be used.
7. Go Mono
For something different, consider converting your image into a monochrome version. This works well with the previous ‘Less Is More’ technique – dark, jagged rocks contrast well with soft, white water in a long exposure for example. Overcast conditions normally also work very well when converted to black and white, with the moody skies adding drama and mystery to your final image.
Sea-stack at Ballydowane Bay, Copper Coast. Image (c) Adrian Hendroff
8. Scout The Cliff Tops
The top of cliffs makes a good vantage point, giving a different perspective, often with spectacular views. The sense of context and scale is also magnified, especially by a wide-angle lens which will exaggerate the cliff’s height. In the spring and summer, cliff-tops are normally coloured with wildflowers such as sea pinks and yellow brooms – all ideal to fill your foreground with. Side-lighting also works well with wider cliff top compositions, with the directional light giving contrast, depth and texture to your image.
Cliff tops are also good places to photograph raging seas and powerful waves. However, stay well away from cliff edges and keep in mind the wind direction (you’d want to be sure the wind doesn’t blow you off the cliff and into the sea!) and strength (anything above 35km/h or 22mph is considered strong and should be avoided).
In some cases, the usage of a telephoto lens on a cliff top helps to create layered compositions, compressing the distance between headlands and coves by creating a ‘stacking effect’.
Cliff scenery along the Copper Coast shot at 100mm. Image (c) Adrian Hendroff
Autumn, Oh Glorious Autumn!
08th October 2021
08th October 2021
Blog entry by Adrian Hendroff
"The trees are in their autumn beauty
The woodland paths are dry,
Under the October twilight the water
Mirrors a still sky"
- William Butler Yeats
If you ask any outdoor photographer what the favourite time of year is for mood, drama, colours and quality of light, you’ll probably be told it’s the autumn. Yep, it’s that time of year when there's a bit of a bite in the air. The atmosphere can be magic; there’s something uniquely special about the quality of light that you won't find at any other time of the year. The golden hour becomes more manageable and you'll also often find beautiful textures, moody clouds, longer shadows and an explosion of colour. During its peak, the leaves that make up its deciduous woodland turn a rich gold, brown, orange and yellows. Mist is also not uncommon as well as beautiful reflections on the lake on calm days. You might get a chance to see the rivers and waterfalls in full flow, while fallen leaves add plenty of colour to the woodland floor. What more can you ask for?
In this blog, we’re going to give you some tips on how to get the best out of this much-loved season. However, before we do, we’d like to invite you to our one-day autumn photography workshop in Wicklow and/or Tollymore. Let us do all the planning and get you all the images that you've always wanted in their vibrant autumn colour! These workshops are very popular and places are limited, so make sure you book your spot early!
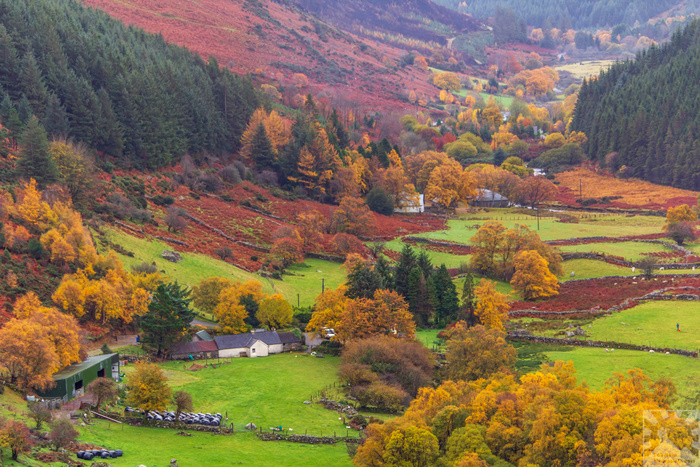
An autumn scene in Wicklow. Image (c) Adrian Hendroff
Back to the tips (you’ll get a few more at the workshop).
1. Location, Location, Location
Knowing an area intimately will definitely work to your favour. So do a bit of planning beforehand, either by scouting an area or looking up Google or tourism websites for the best locations and the peak time for foliage colours. Photography sharing sites like Instagram, 500px and Flickr are also good bets, look up the relevant hashtags and local photographers. If you’d like to take the pressure off yourself, join a photography workshop, such as the one offered here, and let the experts do the work.
2. Zoom Up Close And Personal
Less Is More. In some cases, it helps to strip away the chaos and clutter from the big picture and highlighting just the smaller scenes. For example, this can be a single deciduous tree in a dark forest that is just catching the light. Or it can be a cluster of deciduous trees growing in the middle of a coniferous forest. You can also look at abstract images of autumn foliage, such as a red maple leaf in a water puddle, or a macro image of mushrooms growing on the forest floor surrounded by fallen leaves. It’s all about taking your time; so go for a wander and look for anything that gives contrast or stands out. Unclutter all the distracting elements and focus on the details – a telephoto lens (100-400mm) will really help.
3. Let There Be Light … Or Not
When it comes to autumn photography, sunlight during the day isn’t a key component, especially in the woodland. An overcast day works better as this will give light that isn’t as harsh and more evenly spread. The golden autumn colours contrast really well with the silver-grey sky; and even better still if there is some lingering mist or fog. If a shaft of sunlight breaks through the forest canopy you can try underexposing the scene, keeping the corners of the frame dark and leaving only a deciduous tree in focus for example. The only time when light might be useful is during the golden hours when the sun is still low on the horizon. With clear skies, look out for any shafts of light poking through the trees; if it is coming from the sides it'd be good. Be quick, flexible and move with the changing light – for example if you spot the sun poking out through some tree branches, set your aperture to f/14 or more to get that starburst effect.
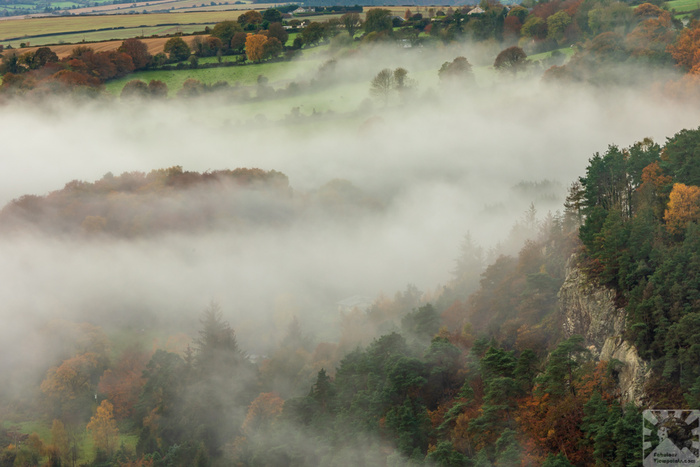
A telephoto composition of fog layers down in a valley. Image (c) Adrian Hendroff
4. Mist/Fog Ain’t So Bad
Misty or foggy conditions in the autumn is a photographer’s dream. Head to a deciduous forest if that is the case or get to an elevated viewpoint above the mist or fog. In the woodland, such conditions add to the atmosphere, mood and mystery of the scene – regardless of the time of day. You’ll get muted colours, dark silhouettes and contrasting layers. Your images will take on a different dimension and you’ll get a satisfying depth-of-field.
5. Get High
It always helps to get to an elevated area and look down on the ‘bigger picture’. This can be above a forested valley, a cliff edge or up on a hill. Such vantage points increases your shooting options: go wide if you’re at the right place over the golden hour to mix in the colourful sky with bright autumn colours; or use your telephoto zoom to pick out more detailed compositions, restricting your composition to only certain elements of the scene like a group or line of trees. You never know, you might find a single deciduous tree surrounded by a clump of evergreen conifers. Mist or fog down in a valley also presents surreal conditions when shooting from an elevated viewpoint.
6. Create A Natural Frame
Get creative and use the colourful autumn leaves as a natural frame for either all or part of your composition. You can also use branches, trees or any natural elements in order to frame your background subject. If your intention is to have everything in focus, check your image after shooting. If it’s not, you will have to use focus-stacking techniques.
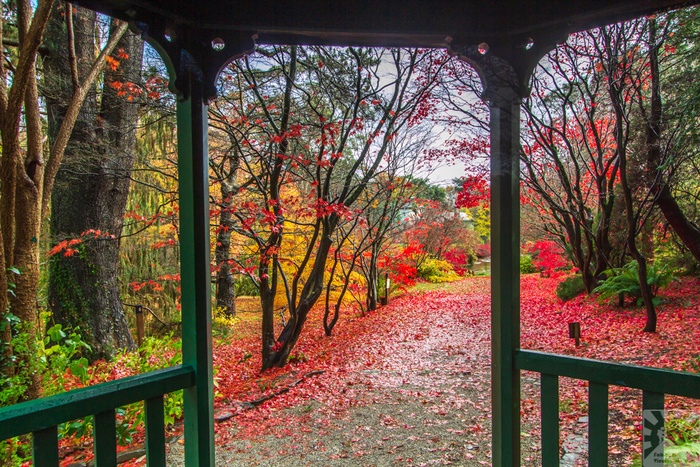
Use the gazebo as a natural frame. Image (c) Adrian Hendroff
7. Look Up
If you’re in a woodland, always look up to see if there are any interesting compositions. Large sessile oak trees with a network of branches are the best ones - you’ll need a wide-angle lens to take in the entire crown of oak branches in all its glory.
8. Leading Lines
Paths and lanes make great leading lines, and if these are flanked by colourful autumnal trees, it’s a dream! The monotone road adds contrast to the scene and if there’s any mist or fog you’re in for a sure winner!
"The trees are in their autumn beauty
The woodland paths are dry,
Under the October twilight the water
Mirrors a still sky"
- William Butler Yeats
If you ask any outdoor photographer what the favourite time of year is for mood, drama, colours and quality of light, you’ll probably be told it’s the autumn. Yep, it’s that time of year when there's a bit of a bite in the air. The atmosphere can be magic; there’s something uniquely special about the quality of light that you won't find at any other time of the year. The golden hour becomes more manageable and you'll also often find beautiful textures, moody clouds, longer shadows and an explosion of colour. During its peak, the leaves that make up its deciduous woodland turn a rich gold, brown, orange and yellows. Mist is also not uncommon as well as beautiful reflections on the lake on calm days. You might get a chance to see the rivers and waterfalls in full flow, while fallen leaves add plenty of colour to the woodland floor. What more can you ask for?
In this blog, we’re going to give you some tips on how to get the best out of this much-loved season. However, before we do, we’d like to invite you to our one-day autumn photography workshop in Wicklow and/or Tollymore. Let us do all the planning and get you all the images that you've always wanted in their vibrant autumn colour! These workshops are very popular and places are limited, so make sure you book your spot early!
An autumn scene in Wicklow. Image (c) Adrian Hendroff
Back to the tips (you’ll get a few more at the workshop).
1. Location, Location, Location
Knowing an area intimately will definitely work to your favour. So do a bit of planning beforehand, either by scouting an area or looking up Google or tourism websites for the best locations and the peak time for foliage colours. Photography sharing sites like Instagram, 500px and Flickr are also good bets, look up the relevant hashtags and local photographers. If you’d like to take the pressure off yourself, join a photography workshop, such as the one offered here, and let the experts do the work.
2. Zoom Up Close And Personal
Less Is More. In some cases, it helps to strip away the chaos and clutter from the big picture and highlighting just the smaller scenes. For example, this can be a single deciduous tree in a dark forest that is just catching the light. Or it can be a cluster of deciduous trees growing in the middle of a coniferous forest. You can also look at abstract images of autumn foliage, such as a red maple leaf in a water puddle, or a macro image of mushrooms growing on the forest floor surrounded by fallen leaves. It’s all about taking your time; so go for a wander and look for anything that gives contrast or stands out. Unclutter all the distracting elements and focus on the details – a telephoto lens (100-400mm) will really help.
3. Let There Be Light … Or Not
When it comes to autumn photography, sunlight during the day isn’t a key component, especially in the woodland. An overcast day works better as this will give light that isn’t as harsh and more evenly spread. The golden autumn colours contrast really well with the silver-grey sky; and even better still if there is some lingering mist or fog. If a shaft of sunlight breaks through the forest canopy you can try underexposing the scene, keeping the corners of the frame dark and leaving only a deciduous tree in focus for example. The only time when light might be useful is during the golden hours when the sun is still low on the horizon. With clear skies, look out for any shafts of light poking through the trees; if it is coming from the sides it'd be good. Be quick, flexible and move with the changing light – for example if you spot the sun poking out through some tree branches, set your aperture to f/14 or more to get that starburst effect.
A telephoto composition of fog layers down in a valley. Image (c) Adrian Hendroff
4. Mist/Fog Ain’t So Bad
Misty or foggy conditions in the autumn is a photographer’s dream. Head to a deciduous forest if that is the case or get to an elevated viewpoint above the mist or fog. In the woodland, such conditions add to the atmosphere, mood and mystery of the scene – regardless of the time of day. You’ll get muted colours, dark silhouettes and contrasting layers. Your images will take on a different dimension and you’ll get a satisfying depth-of-field.
5. Get High
It always helps to get to an elevated area and look down on the ‘bigger picture’. This can be above a forested valley, a cliff edge or up on a hill. Such vantage points increases your shooting options: go wide if you’re at the right place over the golden hour to mix in the colourful sky with bright autumn colours; or use your telephoto zoom to pick out more detailed compositions, restricting your composition to only certain elements of the scene like a group or line of trees. You never know, you might find a single deciduous tree surrounded by a clump of evergreen conifers. Mist or fog down in a valley also presents surreal conditions when shooting from an elevated viewpoint.
6. Create A Natural Frame
Get creative and use the colourful autumn leaves as a natural frame for either all or part of your composition. You can also use branches, trees or any natural elements in order to frame your background subject. If your intention is to have everything in focus, check your image after shooting. If it’s not, you will have to use focus-stacking techniques.
Use the gazebo as a natural frame. Image (c) Adrian Hendroff
7. Look Up
If you’re in a woodland, always look up to see if there are any interesting compositions. Large sessile oak trees with a network of branches are the best ones - you’ll need a wide-angle lens to take in the entire crown of oak branches in all its glory.
8. Leading Lines
Paths and lanes make great leading lines, and if these are flanked by colourful autumnal trees, it’s a dream! The monotone road adds contrast to the scene and if there’s any mist or fog you’re in for a sure winner!
Mountain Layers – The Telephoto Viewpoint
28th July 2021
28th July 2021
Blog entry (c) Adrian Hendroff
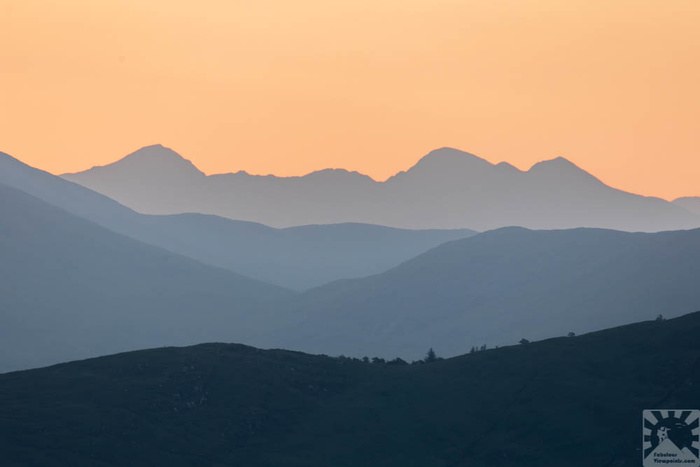
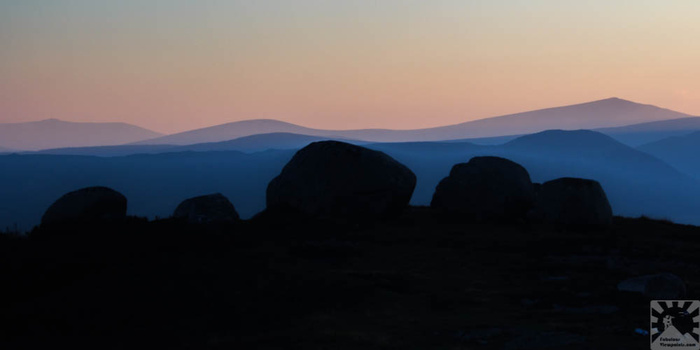
MacGillycuddy's Reeks shot from nearly 42km (26 miles) away from Geokaun on Valentia Island, Co. Kerry, Ireland. (c) Adrian Hendroff.
Canon 5DMkIV, 100-400mm + 1.4x extender f/4.5-5.6L at 560mm, ISO 100, 1/10s at f/9.0. LEE polariser, Tripod. July.
When it comes to mountain photography, a wide-angle zoom lens is said to be the most useful to capture the full majesty of soaring peaks or rolling hills, especially against the backdrop of a colourful sky over the golden hour or a magical cloud inversion. However, a telephoto lens can be equally as useful – in this blog we will discuss the type of landscape images you can come away with a longer lens.
Let’s face it – a telephoto lens is a heavy piece of kit, something that you can probably do without when climbing a mountain or walking up a hill. Most of them weigh somewhere between 1kg to 1.8kg, click here for a guide to the best telephoto lenses in the market. However, if you scroll down the list, you’ll also find a number of compact telephoto lenses such as the Canon EF 70-300mm f/4-5.6 IS II USM (710g), Nikon AF-P 70-300mm f/4.5-5.6E ED VR (680g) and Sony E 70-350mm f/4.5-6.3 G OSS (625g) – these all offer a good compromise from the weight perspective when compared to the heavier ‘bazookas’.
So what exactly does a telephoto lens offer the landscape photographer in the hills or mountains? Well, straight off the textbook it allows you to compress the perspective, shortening the distance between near and far subjects within a scene – effectively making imposing hills or mountains look all the more dramatic.
One of the things you should look out for are ‘layers’ in the landscape - these will give you some compelling compositions. Summits are great places to have fun with such compositions if there are distant forest plantations, hills or mountains that will provide those layers.
Backlit skies, where the sun is behind the subject, is preferable. You’ll get purple, pink, orange or yellow colours in the sky at pre-dawn or post-sunset. Be ready for it as this can sometimes occur up to thirty minutes before sunrise or after sunset. Over this time, point your camera toward the source of light (a technique known as contre-jour, French for ‘against daylight’ photography). If your lens can’t auto focus due to low light levels, you’ll need to manually focus. In most cases, there is no need for any ND grad filters but consider using a polariser to make the colours pop.
You don’t need clouds to shoot landscape layers, even an empty sky at pre-dawn or post-sunset can give magical light. During this time, the light travels at an angle which casts long shadows as it breaks over each layer. The layers now show up as a gradient of tones, with every contour and shape emphasised by silhouettes that adds atmosphere, depth and contrast.
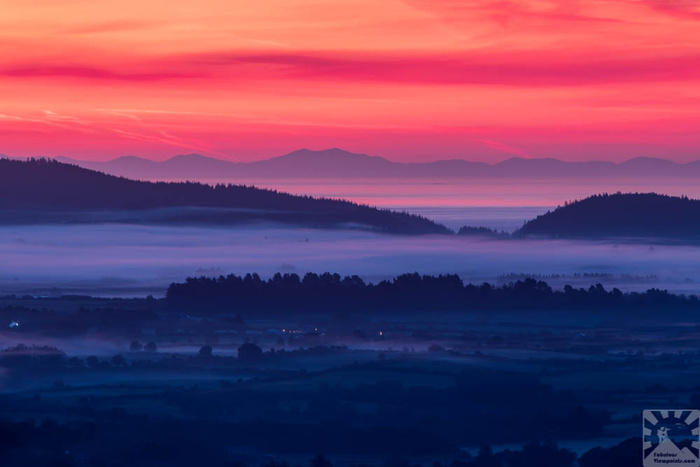
Mist and fog can be great! (c) Adrian Hendroff.
Canon 5DMkIV, 70-300mm f/4-5.6L at 300mm, ISO 100, 10s at f/11. Tripod.
Here are a few more tips when photographing landscape layers in the hills or mountains:
Boulders make useful foregrounds. (c) Adrian Hendroff.
Canon 5DMkIV, 70-300mm f/4-5.6L at 100mm, ISO 100, 1/5s at f/11. Tripod.
Coming Soon
Look out for our Golden Hour Photography Hikes where we’ll look at all these techniques in detail in the Irish hills. Email us on fabulousviewpoints@gmail.com to register your interest.
Want To Improve Your Mountain Photography?
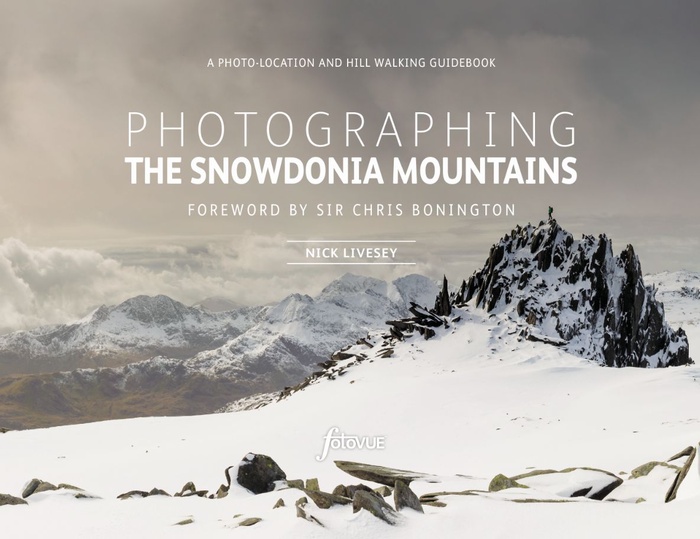
We recommend this book Photographing The Snowdonia Mountains (published by Fotovue) that will provide inspiration and motivation, as well as studies in composition and light to learn from. If you’re based in Ireland or Northern Ireland get it here and use the code SUMMER to get 10% off until 31 August 2021 (the code applies to all the other Fotovue titles in our bookshop as well - while stocks last!). If you’re based outside of Ireland or Northern Ireland, order it directly from Fotovue by clicking here or on Amazon.
Like What You See?
Then be sure to follow us on Instagram, Facebook or Twitter for regular updates.
MacGillycuddy's Reeks shot from nearly 42km (26 miles) away from Geokaun on Valentia Island, Co. Kerry, Ireland. (c) Adrian Hendroff.
Canon 5DMkIV, 100-400mm + 1.4x extender f/4.5-5.6L at 560mm, ISO 100, 1/10s at f/9.0. LEE polariser, Tripod. July.
When it comes to mountain photography, a wide-angle zoom lens is said to be the most useful to capture the full majesty of soaring peaks or rolling hills, especially against the backdrop of a colourful sky over the golden hour or a magical cloud inversion. However, a telephoto lens can be equally as useful – in this blog we will discuss the type of landscape images you can come away with a longer lens.
Let’s face it – a telephoto lens is a heavy piece of kit, something that you can probably do without when climbing a mountain or walking up a hill. Most of them weigh somewhere between 1kg to 1.8kg, click here for a guide to the best telephoto lenses in the market. However, if you scroll down the list, you’ll also find a number of compact telephoto lenses such as the Canon EF 70-300mm f/4-5.6 IS II USM (710g), Nikon AF-P 70-300mm f/4.5-5.6E ED VR (680g) and Sony E 70-350mm f/4.5-6.3 G OSS (625g) – these all offer a good compromise from the weight perspective when compared to the heavier ‘bazookas’.
So what exactly does a telephoto lens offer the landscape photographer in the hills or mountains? Well, straight off the textbook it allows you to compress the perspective, shortening the distance between near and far subjects within a scene – effectively making imposing hills or mountains look all the more dramatic.
One of the things you should look out for are ‘layers’ in the landscape - these will give you some compelling compositions. Summits are great places to have fun with such compositions if there are distant forest plantations, hills or mountains that will provide those layers.
Backlit skies, where the sun is behind the subject, is preferable. You’ll get purple, pink, orange or yellow colours in the sky at pre-dawn or post-sunset. Be ready for it as this can sometimes occur up to thirty minutes before sunrise or after sunset. Over this time, point your camera toward the source of light (a technique known as contre-jour, French for ‘against daylight’ photography). If your lens can’t auto focus due to low light levels, you’ll need to manually focus. In most cases, there is no need for any ND grad filters but consider using a polariser to make the colours pop.
You don’t need clouds to shoot landscape layers, even an empty sky at pre-dawn or post-sunset can give magical light. During this time, the light travels at an angle which casts long shadows as it breaks over each layer. The layers now show up as a gradient of tones, with every contour and shape emphasised by silhouettes that adds atmosphere, depth and contrast.
Mist and fog can be great! (c) Adrian Hendroff.
Canon 5DMkIV, 70-300mm f/4-5.6L at 300mm, ISO 100, 10s at f/11. Tripod.
Here are a few more tips when photographing landscape layers in the hills or mountains:
- If the sun is still above the horizon, try to place it just outside the frame. Use a lens hood or a piece of cardboard if needed to prevent lens flare. Keep in mind any filters attached increases the risk of lens flare, so try removing such attachments. If it’s still there, tidy it up during post-processing using the Spot Healing Brush tool in Photoshop, for example.
- Include a subject for the viewer to have a special connection and a sense of scale – this can be anything from another photographer or large boulders in the foreground. Once your image is taken, check if it is sharp from front-to-back and use focus-stacking techniques if it isn’t.
- Make sure your horizon is straight when shooting layers – check using your bubble-level on your tripod or the level feature on your camera viewfinder.
- Try converting your image to monochrome, you might be surprised with the results.
- Any mist or fog will add to the mood and drama of the layers – look out for our upcoming course on how to improve your hit rate with such conditions.
Boulders make useful foregrounds. (c) Adrian Hendroff.
Canon 5DMkIV, 70-300mm f/4-5.6L at 100mm, ISO 100, 1/5s at f/11. Tripod.
Coming Soon
Look out for our Golden Hour Photography Hikes where we’ll look at all these techniques in detail in the Irish hills. Email us on fabulousviewpoints@gmail.com to register your interest.
Want To Improve Your Mountain Photography?
We recommend this book Photographing The Snowdonia Mountains (published by Fotovue) that will provide inspiration and motivation, as well as studies in composition and light to learn from. If you’re based in Ireland or Northern Ireland get it here and use the code SUMMER to get 10% off until 31 August 2021 (the code applies to all the other Fotovue titles in our bookshop as well - while stocks last!). If you’re based outside of Ireland or Northern Ireland, order it directly from Fotovue by clicking here or on Amazon.
Like What You See?
Then be sure to follow us on Instagram, Facebook or Twitter for regular updates.
Meteors and the Milky Way off the Dublin Coastline
07th July 2021
07th July 2021
In: Astrophotography
Blog entry (c) Adrian Hendroff
In the early hours of 6th May 2021, I set off to photograph the milky way rising off the Dublin coast of Rush with my friends James and Ronan. Making our way down a narrow path to a rocky foreshore southeast of Rush Harbour, we could see millions of stars twinkling in the clear night sky. A Martello Tower overlooks this stretch of coast, which is sheltered by a strip of high ground on its landward end; handy as it blocks off light pollution from nearby streets and Rush town. The spiky rock formations found here adds some much-needed foreground interest while shooting out to sea in the direction of Lambay Island, where the milky way will arch over when it rises.
The night sky, however, wasn’t all about the milky way. The Eta Aquarids, the third meteor shower of the year (after the Quadrantid and Lyrid) was due to put on a show in the predawn hours. With around 10 meteors per hour expected from its point of origin to the southeast, this location was ideal to try and capture both the milky way and the Eta Aquarids in the same frame. However, saying that I must stress that photographing meteors is a bit like wildlife photography or even fishing – you could be there for a while waiting!
With the tripod in place and focus manually established, it meant I could relax and enjoy the show. The plan was to shoot the milky way, then leave the camera to shoot a sequence of frames over the next hour and a half or so to catch any meteors. The calm conditions and tide which was approaching its low state, meant I do could this in comfort - my only regret was accidentally leaving my flask of hot tea back in the car!
First up was shooting around a dozen of frames around the time when the galactic core became visible highest in the sky. As I wasn’t using a Star Tracker, the idea is to stack these frames later in Sequator to help reduce noise, hot pixels, light pollution and in some cases, I find it is even useful to give the stars in my image more pop.
Once the milky way was captured, it was a matter of waiting for any meteors to streak across the eastern sky. “Look, one overhead!”, yelled Ronan making me look up just in time to catch a streak of light. I shot nearly 360 frames, and in the end only used 11. As dawn approached, I did a final exposure to take in the foreground, as the glimmer of light out on the horizon meant I could reduce my ISO to improve image quality.
Interested in an Astrophotography Workshop?
We run regular Beginners Astrophotography workshops throughout the year via Zoom and on-location in Ireland. To find out more, click here.
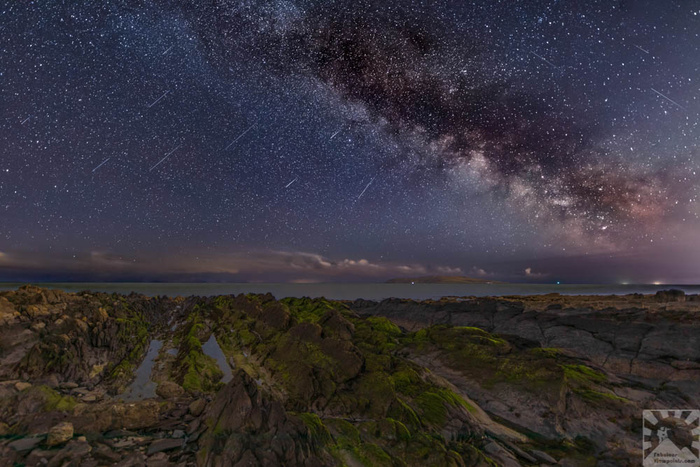
Image above stacked and blended from a combination of exposures.
Distinguishing Meteors from Plane Trails and Satellites
Plane trails are easily identifiable by the dotted patterns along solid lines – these dots caused by blinking aircraft wing and tail lights. Satellite streaks are a bit trickier to identify: in the image above, I counted up to 5 meteors, the rest are satellite streaks – so how can one tell the difference? Well, in a nutshell, you’ll rarely find meteors in consecutive frames; if you see them in 3 frames or more it’s more than likely a satellite. Unlike satellites, meteors generally have one long tapered end and fluctuates in brightness, bulging before burning up. Meteors also typically have colour and can be traced back to a radiant point. For an in-depth blog on how to distinguish meteors from satellites read a detailed blog here by Alyn Wallace, author of the forthcoming Photographing The Night Sky book published by Fotovue. If you’re living in Ireland and Northern Ireland, a selection of Fotovue books can be purchased from here, whereas outside of Ireland, please buy them direct from Fotovue or you’ll also find them on Amazon.
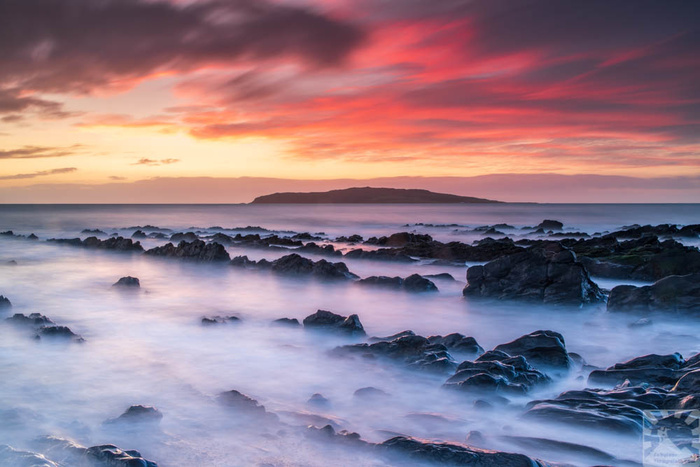
Rush at Sunrise
This location is also great for photographing the sunrise, below is an image to whet your appetite. You can get this packaged and ready to hang on your wall at home or in the office. If you’re living in Ireland/Northern Ireland click here or if in the UK/Europe/USA/Canada/Australia click here.
Forthcoming Meteors Showers
Getting To Rush
Rush is a small seaside town south of Skerries and around half-an-hour’s drive from Dublin Airport. Head north on the M1 and exit at Junction 4. then aim for the R132 in the direction of Skerries/Rush. Later take the R127 by turning right just after passing Blakes Cross Service Centre and follow signs for the R127/R128 over some roundabouts to Rush. Park in spaces adjacent to a playground (and just after The Harbour Bar) near Rush Harbour.
Lat/Long: 53.522577, -6.0820633
Grid Ref: O 272 542
what3words: ///parity.carnivore.stays
Like What You See?
Then be sure to follow us on Instagram, Facebook or Twitter for regular updates.
In the early hours of 6th May 2021, I set off to photograph the milky way rising off the Dublin coast of Rush with my friends James and Ronan. Making our way down a narrow path to a rocky foreshore southeast of Rush Harbour, we could see millions of stars twinkling in the clear night sky. A Martello Tower overlooks this stretch of coast, which is sheltered by a strip of high ground on its landward end; handy as it blocks off light pollution from nearby streets and Rush town. The spiky rock formations found here adds some much-needed foreground interest while shooting out to sea in the direction of Lambay Island, where the milky way will arch over when it rises.
The night sky, however, wasn’t all about the milky way. The Eta Aquarids, the third meteor shower of the year (after the Quadrantid and Lyrid) was due to put on a show in the predawn hours. With around 10 meteors per hour expected from its point of origin to the southeast, this location was ideal to try and capture both the milky way and the Eta Aquarids in the same frame. However, saying that I must stress that photographing meteors is a bit like wildlife photography or even fishing – you could be there for a while waiting!
With the tripod in place and focus manually established, it meant I could relax and enjoy the show. The plan was to shoot the milky way, then leave the camera to shoot a sequence of frames over the next hour and a half or so to catch any meteors. The calm conditions and tide which was approaching its low state, meant I do could this in comfort - my only regret was accidentally leaving my flask of hot tea back in the car!
First up was shooting around a dozen of frames around the time when the galactic core became visible highest in the sky. As I wasn’t using a Star Tracker, the idea is to stack these frames later in Sequator to help reduce noise, hot pixels, light pollution and in some cases, I find it is even useful to give the stars in my image more pop.
Once the milky way was captured, it was a matter of waiting for any meteors to streak across the eastern sky. “Look, one overhead!”, yelled Ronan making me look up just in time to catch a streak of light. I shot nearly 360 frames, and in the end only used 11. As dawn approached, I did a final exposure to take in the foreground, as the glimmer of light out on the horizon meant I could reduce my ISO to improve image quality.
Interested in an Astrophotography Workshop?
We run regular Beginners Astrophotography workshops throughout the year via Zoom and on-location in Ireland. To find out more, click here.
Image above stacked and blended from a combination of exposures.
- Sky - Milky Way: Canon 5DMkIV, Sigma 14mm f/1.8DG Art, ISO 3200, 15.0s at f/1.8. 12x stacked in Sequator. Tripod.
- Sky - Meteors and Satellites: Canon 5DMkIV, Sigma 14mm f/1.8DG Art, ISO 3200, 15.0s at f/1.8. 11x stacked in Sequator. Tripod.
- Foreground: Canon 5DMkIV, Sigma 14mm f/1.8DG Art, ISO 640, 120.0s at f/1.8. Tripod.
Distinguishing Meteors from Plane Trails and Satellites
Plane trails are easily identifiable by the dotted patterns along solid lines – these dots caused by blinking aircraft wing and tail lights. Satellite streaks are a bit trickier to identify: in the image above, I counted up to 5 meteors, the rest are satellite streaks – so how can one tell the difference? Well, in a nutshell, you’ll rarely find meteors in consecutive frames; if you see them in 3 frames or more it’s more than likely a satellite. Unlike satellites, meteors generally have one long tapered end and fluctuates in brightness, bulging before burning up. Meteors also typically have colour and can be traced back to a radiant point. For an in-depth blog on how to distinguish meteors from satellites read a detailed blog here by Alyn Wallace, author of the forthcoming Photographing The Night Sky book published by Fotovue. If you’re living in Ireland and Northern Ireland, a selection of Fotovue books can be purchased from here, whereas outside of Ireland, please buy them direct from Fotovue or you’ll also find them on Amazon.
Rush at Sunrise
This location is also great for photographing the sunrise, below is an image to whet your appetite. You can get this packaged and ready to hang on your wall at home or in the office. If you’re living in Ireland/Northern Ireland click here or if in the UK/Europe/USA/Canada/Australia click here.
Forthcoming Meteors Showers
- Delta Aquarid: peaking on 28/29 July at predawn to the south; around 10 meteors per hour.
- Perseid: peaking on 11/12 August at predawn to the northeast; around 50 meteors per hour.
Getting To Rush
Rush is a small seaside town south of Skerries and around half-an-hour’s drive from Dublin Airport. Head north on the M1 and exit at Junction 4. then aim for the R132 in the direction of Skerries/Rush. Later take the R127 by turning right just after passing Blakes Cross Service Centre and follow signs for the R127/R128 over some roundabouts to Rush. Park in spaces adjacent to a playground (and just after The Harbour Bar) near Rush Harbour.
Lat/Long: 53.522577, -6.0820633
Grid Ref: O 272 542
what3words: ///parity.carnivore.stays
Like What You See?
Then be sure to follow us on Instagram, Facebook or Twitter for regular updates.
Fanad Head Lighthouse - Photograph It In The Best Light
28th June 2021
28th June 2021
Blog entry (c) Adrian Hendroff

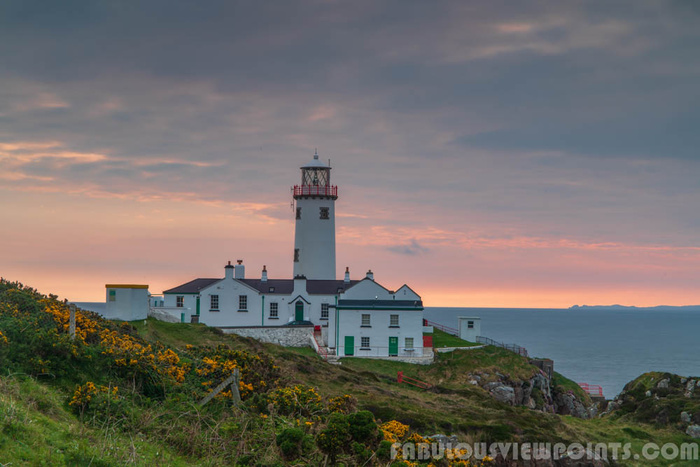
Fanad Head Lighthouse to the southeast. (c) Adrian Hendroff.
Canon 5DMkIV, 16-35mm f/4L at 16mm, ISO 50, 30s at f/22. LEE polariser, 0.9 soft ND grad. Tripod. May.
Perched on a rugged clifftop on the mouth of Lough Swilly (Loch Súilí meaning ‘Lake of Shadows’ or ‘Lake of Eyes’), Fanad Lighthouse is regarded as one of Ireland’s great lighthouses and certainly one of the most beautiful in the world. It is found on the northeastern tip of the windswept Fanad Peninsula, a remote and stunningly beautiful corner of Ireland’s Wild Atlantic Way. The lighthouse was proposed in 1811 following the shipwreck of the HMS Saldanha in Lough Swilly. Designed by the renowned engineer George Halpin, Fanad Lighthouse was first lit on 17th March 1817. The lighthouse was converted to electric operation in 1975 and finally automated in 1983.
Photograph It In The Best Light
From the cul-de-sac outside the lighthouse gate, cross the fence then follow a wall that runs along an abandoned Victorian Coast Guard Station built in the late nineteenth century. The path by the wall (it is narrow along a short stretch so take care) should take you to a cliff-top overlooking a narrow and rocky sea-inlet with the lighthouse on the opposite end. Stand well away from cliff-edges while photographing, especially if it is windy.
Arrive early to cherry-pick the best spot to mount your tripod and shoot from; sunrise is generally the best time to shoot the lighthouse for the best light. If you’re here early from October to February, you’ll find vivid skies at dawn away to the southeast – so you might want to make your way farther along the cliff-top before shooting back at the lighthouse. On the other hand, from April to August the most colourful skies are to be found further to the northeast so a better place to shoot is from a grassy cliff-top ledge adjacent to the wall. Make sure to use a polariser to make those beautiful dawn colours pop and also to reduce any glare. This is a great place to experiment with those ND filters for longer exposures ranging from a second (if there are breaking waves in the inlet below) to a few minutes (to really smooth the water).
You may also want to catch a glimpse of the lighthouse from the south. For this, carefully get over the fence to the right of the lighthouse gate, then follow its perimeter fence until the lighthouse comes into view. You’ll need a zoom lens to shoot from here, with the best light occurring at dawn over the summer months.
Fanad Head Lighthouse from the south. (c) Adrian Hendroff.
Canon 5DMkIV, 24-70mm f/4L at 70mm, ISO 50, 6.0s at f/22. LEE polariser, 0.9 soft ND grad. Tripod. May.
Did You Know?
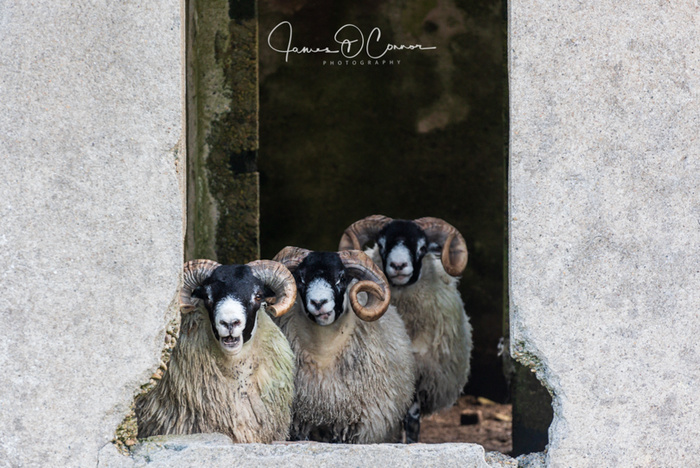
Sheep gazing out of the abandoned Coast Guard Station. (c) James O'Connor.
Nikon D810, 70-300mm at 170mm, ISO 800, 1/400s at f/5. May.
Into Astrophotography?
Fanad Lighthouse is also a great spot to shoot the milky-way over the early months of the year as the Galactic Core rises to the southeast. Use Photopills to plan or email fabulousviewpoints@gmail.com to register your interest in our upcoming Photographing the Night Sky course. You can also view some of our night sky images here.
Want to explore Donegal on foot?
Get a guidebook. We recommend Donegal, Sligo & Leitrim by Adrian Hendroff, published by the Collins Press. Click here to view a listing of the 27 walks on offer from the wild, untamed landscape of Donegal, with its mountains, sea-cliffs and glens, to the gentler hills, green valleys and picturesque escarpments of Sligo and Leitrim.
Getting There:
Around 45km / 50 minutes north of Letterkenny; take the N56 then the R249/246 to Milford. Later at Carrowkeel follow the road that runs along the eastern shores of Mulroy Bay through Tawny before veering northeast via Magheradrumman to reach a cul-de-sac at Fanad Head Lighthouse.
Lat/Long: 55.275611, -7.6345351
Grid Ref: C 23274 47667
what3words: ///cassette.byways.asked
Like What You See?
Then be sure to follow us on Instagram, Facebook or Twitter for regular updates.
Fanad Head Lighthouse to the southeast. (c) Adrian Hendroff.
Canon 5DMkIV, 16-35mm f/4L at 16mm, ISO 50, 30s at f/22. LEE polariser, 0.9 soft ND grad. Tripod. May.
Perched on a rugged clifftop on the mouth of Lough Swilly (Loch Súilí meaning ‘Lake of Shadows’ or ‘Lake of Eyes’), Fanad Lighthouse is regarded as one of Ireland’s great lighthouses and certainly one of the most beautiful in the world. It is found on the northeastern tip of the windswept Fanad Peninsula, a remote and stunningly beautiful corner of Ireland’s Wild Atlantic Way. The lighthouse was proposed in 1811 following the shipwreck of the HMS Saldanha in Lough Swilly. Designed by the renowned engineer George Halpin, Fanad Lighthouse was first lit on 17th March 1817. The lighthouse was converted to electric operation in 1975 and finally automated in 1983.
Photograph It In The Best Light
From the cul-de-sac outside the lighthouse gate, cross the fence then follow a wall that runs along an abandoned Victorian Coast Guard Station built in the late nineteenth century. The path by the wall (it is narrow along a short stretch so take care) should take you to a cliff-top overlooking a narrow and rocky sea-inlet with the lighthouse on the opposite end. Stand well away from cliff-edges while photographing, especially if it is windy.
Arrive early to cherry-pick the best spot to mount your tripod and shoot from; sunrise is generally the best time to shoot the lighthouse for the best light. If you’re here early from October to February, you’ll find vivid skies at dawn away to the southeast – so you might want to make your way farther along the cliff-top before shooting back at the lighthouse. On the other hand, from April to August the most colourful skies are to be found further to the northeast so a better place to shoot is from a grassy cliff-top ledge adjacent to the wall. Make sure to use a polariser to make those beautiful dawn colours pop and also to reduce any glare. This is a great place to experiment with those ND filters for longer exposures ranging from a second (if there are breaking waves in the inlet below) to a few minutes (to really smooth the water).
You may also want to catch a glimpse of the lighthouse from the south. For this, carefully get over the fence to the right of the lighthouse gate, then follow its perimeter fence until the lighthouse comes into view. You’ll need a zoom lens to shoot from here, with the best light occurring at dawn over the summer months.
Fanad Head Lighthouse from the south. (c) Adrian Hendroff.
Canon 5DMkIV, 24-70mm f/4L at 70mm, ISO 50, 6.0s at f/22. LEE polariser, 0.9 soft ND grad. Tripod. May.
Did You Know?
- Get unique prints (print only, framed, canvas or acrylic) of Fanad Lighthouse packaged and ready to hang on your wall at home or in the office. If you’re living in Ireland/Northern Ireland click here or if in the UK/Europe/USA/Canada/Australia click here.
- You can stay overnight in beautifully restored lightkeeper’s cottages at the lighthouse, and there are also guided/group tours of the lighthouse. Click here for more information.
- Fanad Lighthouse survived a lightning strike on a cold December’s night shortly before Christmas Day in 1916.
- The lighthouse tower is 22m high from its foundation to the top (not including its lantern). The light is around 40m above sea level and there are 76 steps in the tower – 59 of these are spiral granite and the rest are ladder steps.
- Lough Swilly is one of Ireland’s three glacial fjords. Can you name the other two?
- The derelict Coast Guard Station is great for photographing Donegal livestock that reside there!
Sheep gazing out of the abandoned Coast Guard Station. (c) James O'Connor.
Nikon D810, 70-300mm at 170mm, ISO 800, 1/400s at f/5. May.
Into Astrophotography?
Fanad Lighthouse is also a great spot to shoot the milky-way over the early months of the year as the Galactic Core rises to the southeast. Use Photopills to plan or email fabulousviewpoints@gmail.com to register your interest in our upcoming Photographing the Night Sky course. You can also view some of our night sky images here.
Want to explore Donegal on foot?
Get a guidebook. We recommend Donegal, Sligo & Leitrim by Adrian Hendroff, published by the Collins Press. Click here to view a listing of the 27 walks on offer from the wild, untamed landscape of Donegal, with its mountains, sea-cliffs and glens, to the gentler hills, green valleys and picturesque escarpments of Sligo and Leitrim.
Getting There:
Around 45km / 50 minutes north of Letterkenny; take the N56 then the R249/246 to Milford. Later at Carrowkeel follow the road that runs along the eastern shores of Mulroy Bay through Tawny before veering northeast via Magheradrumman to reach a cul-de-sac at Fanad Head Lighthouse.
Lat/Long: 55.275611, -7.6345351
Grid Ref: C 23274 47667
what3words: ///cassette.byways.asked
Like What You See?
Then be sure to follow us on Instagram, Facebook or Twitter for regular updates.