Blog entry (c) Adrian Hendroff
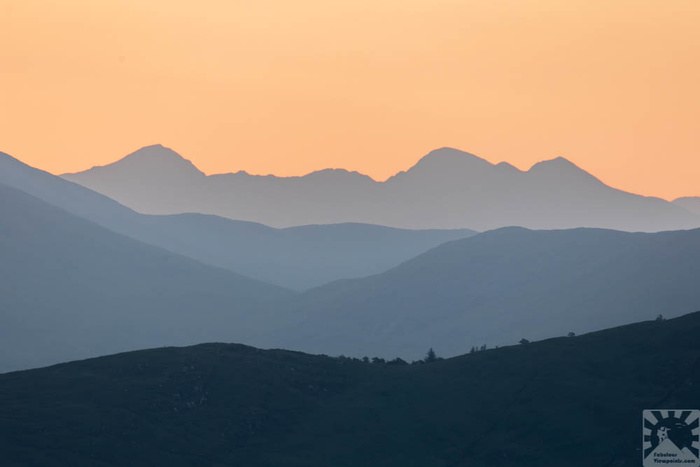
MacGillycuddy's Reeks shot from nearly 42km (26 miles) away from Geokaun on Valentia Island, Co. Kerry, Ireland. (c) Adrian Hendroff.
Canon 5DMkIV, 100-400mm + 1.4x extender f/4.5-5.6L at 560mm, ISO 100, 1/10s at f/9.0. LEE polariser, Tripod. July.
When it comes to mountain photography, a wide-angle zoom lens is said to be the most useful to capture the full majesty of soaring peaks or rolling hills, especially against the backdrop of a colourful sky over the golden hour or a magical cloud inversion. However, a telephoto lens can be equally as useful – in this blog we will discuss the type of landscape images you can come away with a longer lens.
Let’s face it – a telephoto lens is a heavy piece of kit, something that you can probably do without when climbing a mountain or walking up a hill. Most of them weigh somewhere between 1kg to 1.8kg, click here for a guide to the best telephoto lenses in the market. However, if you scroll down the list, you’ll also find a number of compact telephoto lenses such as the Canon EF 70-300mm f/4-5.6 IS II USM (710g), Nikon AF-P 70-300mm f/4.5-5.6E ED VR (680g) and Sony E 70-350mm f/4.5-6.3 G OSS (625g) – these all offer a good compromise from the weight perspective when compared to the heavier ‘bazookas’.
So what exactly does a telephoto lens offer the landscape photographer in the hills or mountains? Well, straight off the textbook it allows you to compress the perspective, shortening the distance between near and far subjects within a scene – effectively making imposing hills or mountains look all the more dramatic.
One of the things you should look out for are ‘layers’ in the landscape - these will give you some compelling compositions. Summits are great places to have fun with such compositions if there are distant forest plantations, hills or mountains that will provide those layers.
Backlit skies, where the sun is behind the subject, is preferable. You’ll get purple, pink, orange or yellow colours in the sky at pre-dawn or post-sunset. Be ready for it as this can sometimes occur up to thirty minutes before sunrise or after sunset. Over this time, point your camera toward the source of light (a technique known as contre-jour, French for ‘against daylight’ photography). If your lens can’t auto focus due to low light levels, you’ll need to manually focus. In most cases, there is no need for any ND grad filters but consider using a polariser to make the colours pop.
You don’t need clouds to shoot landscape layers, even an empty sky at pre-dawn or post-sunset can give magical light. During this time, the light travels at an angle which casts long shadows as it breaks over each layer. The layers now show up as a gradient of tones, with every contour and shape emphasised by silhouettes that adds atmosphere, depth and contrast.
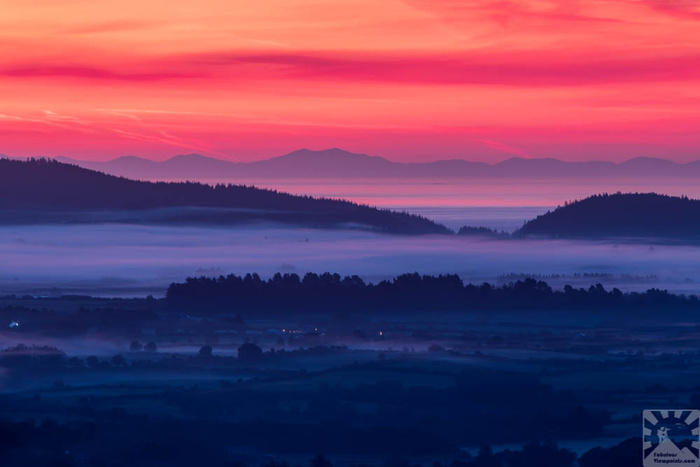
Mist and fog can be great! (c) Adrian Hendroff.
Canon 5DMkIV, 70-300mm f/4-5.6L at 300mm, ISO 100, 10s at f/11. Tripod.
Here are a few more tips when photographing landscape layers in the hills or mountains:
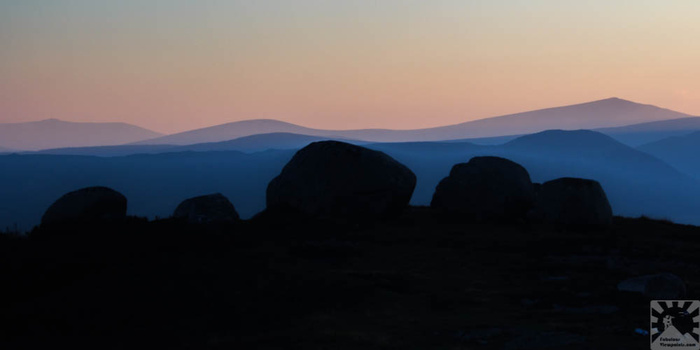
Boulders make useful foregrounds. (c) Adrian Hendroff.
Canon 5DMkIV, 70-300mm f/4-5.6L at 100mm, ISO 100, 1/5s at f/11. Tripod.
Coming Soon
Look out for our Golden Hour Photography Hikes where we’ll look at all these techniques in detail in the Irish hills. Email us on fabulousviewpoints@gmail.com to register your interest.
Want To Improve Your Mountain Photography?
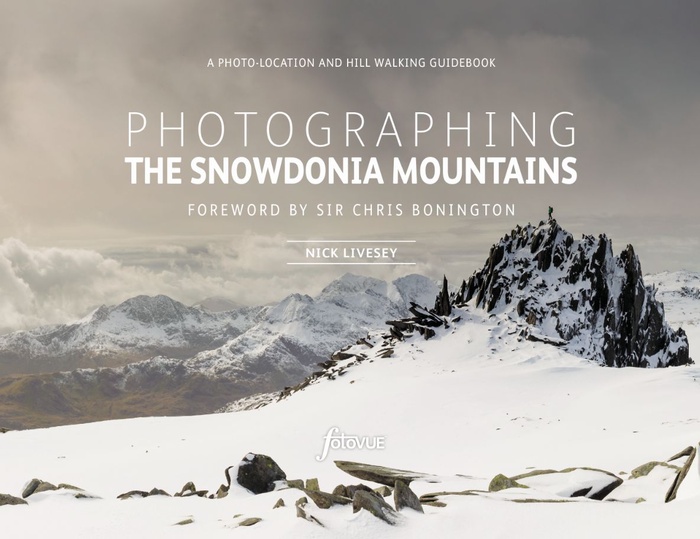
We recommend this book Photographing The Snowdonia Mountains (published by Fotovue) that will provide inspiration and motivation, as well as studies in composition and light to learn from. If you’re based in Ireland or Northern Ireland get it here and use the code SUMMER to get 10% off until 31 August 2021 (the code applies to all the other Fotovue titles in our bookshop as well - while stocks last!). If you’re based outside of Ireland or Northern Ireland, order it directly from Fotovue by clicking here or on Amazon.
Like What You See?
Then be sure to follow us on Instagram, Facebook or Twitter for regular updates.
MacGillycuddy's Reeks shot from nearly 42km (26 miles) away from Geokaun on Valentia Island, Co. Kerry, Ireland. (c) Adrian Hendroff.
Canon 5DMkIV, 100-400mm + 1.4x extender f/4.5-5.6L at 560mm, ISO 100, 1/10s at f/9.0. LEE polariser, Tripod. July.
When it comes to mountain photography, a wide-angle zoom lens is said to be the most useful to capture the full majesty of soaring peaks or rolling hills, especially against the backdrop of a colourful sky over the golden hour or a magical cloud inversion. However, a telephoto lens can be equally as useful – in this blog we will discuss the type of landscape images you can come away with a longer lens.
Let’s face it – a telephoto lens is a heavy piece of kit, something that you can probably do without when climbing a mountain or walking up a hill. Most of them weigh somewhere between 1kg to 1.8kg, click here for a guide to the best telephoto lenses in the market. However, if you scroll down the list, you’ll also find a number of compact telephoto lenses such as the Canon EF 70-300mm f/4-5.6 IS II USM (710g), Nikon AF-P 70-300mm f/4.5-5.6E ED VR (680g) and Sony E 70-350mm f/4.5-6.3 G OSS (625g) – these all offer a good compromise from the weight perspective when compared to the heavier ‘bazookas’.
So what exactly does a telephoto lens offer the landscape photographer in the hills or mountains? Well, straight off the textbook it allows you to compress the perspective, shortening the distance between near and far subjects within a scene – effectively making imposing hills or mountains look all the more dramatic.
One of the things you should look out for are ‘layers’ in the landscape - these will give you some compelling compositions. Summits are great places to have fun with such compositions if there are distant forest plantations, hills or mountains that will provide those layers.
Backlit skies, where the sun is behind the subject, is preferable. You’ll get purple, pink, orange or yellow colours in the sky at pre-dawn or post-sunset. Be ready for it as this can sometimes occur up to thirty minutes before sunrise or after sunset. Over this time, point your camera toward the source of light (a technique known as contre-jour, French for ‘against daylight’ photography). If your lens can’t auto focus due to low light levels, you’ll need to manually focus. In most cases, there is no need for any ND grad filters but consider using a polariser to make the colours pop.
You don’t need clouds to shoot landscape layers, even an empty sky at pre-dawn or post-sunset can give magical light. During this time, the light travels at an angle which casts long shadows as it breaks over each layer. The layers now show up as a gradient of tones, with every contour and shape emphasised by silhouettes that adds atmosphere, depth and contrast.
Mist and fog can be great! (c) Adrian Hendroff.
Canon 5DMkIV, 70-300mm f/4-5.6L at 300mm, ISO 100, 10s at f/11. Tripod.
Here are a few more tips when photographing landscape layers in the hills or mountains:
- If the sun is still above the horizon, try to place it just outside the frame. Use a lens hood or a piece of cardboard if needed to prevent lens flare. Keep in mind any filters attached increases the risk of lens flare, so try removing such attachments. If it’s still there, tidy it up during post-processing using the Spot Healing Brush tool in Photoshop, for example.
- Include a subject for the viewer to have a special connection and a sense of scale – this can be anything from another photographer or large boulders in the foreground. Once your image is taken, check if it is sharp from front-to-back and use focus-stacking techniques if it isn’t.
- Make sure your horizon is straight when shooting layers – check using your bubble-level on your tripod or the level feature on your camera viewfinder.
- Try converting your image to monochrome, you might be surprised with the results.
- Any mist or fog will add to the mood and drama of the layers – look out for our upcoming course on how to improve your hit rate with such conditions.
Boulders make useful foregrounds. (c) Adrian Hendroff.
Canon 5DMkIV, 70-300mm f/4-5.6L at 100mm, ISO 100, 1/5s at f/11. Tripod.
Coming Soon
Look out for our Golden Hour Photography Hikes where we’ll look at all these techniques in detail in the Irish hills. Email us on fabulousviewpoints@gmail.com to register your interest.
Want To Improve Your Mountain Photography?
We recommend this book Photographing The Snowdonia Mountains (published by Fotovue) that will provide inspiration and motivation, as well as studies in composition and light to learn from. If you’re based in Ireland or Northern Ireland get it here and use the code SUMMER to get 10% off until 31 August 2021 (the code applies to all the other Fotovue titles in our bookshop as well - while stocks last!). If you’re based outside of Ireland or Northern Ireland, order it directly from Fotovue by clicking here or on Amazon.
Like What You See?
Then be sure to follow us on Instagram, Facebook or Twitter for regular updates.